Treatment area is the patch of skin that a panel lights at a useful irradiance from where you are actually standing, and it is always smaller than the printed panel size. The panel's physical face sets the ceiling, distance changes how the light spreads across it, and every real panel is brightest near the middle and weaker toward the edges, so the usable area is the part of the face where the reading is still close to the figure on the spec sheet.
Choosing a panel? Our ranking of the best red light therapy panels is computed from published, method-labeled specs across 188 devices. For coverage, the spec that matters is the panel's measured irradiance together with its dimensions, because one without the other cannot tell you how much body gets a real dose.
Three different areas that get confused
A spec sheet blurs three separate quantities, and keeping them apart makes every later estimate easier.
- Panel area. The outer dimensions multiplied together. The RLT Home Total Spectrum COMPACT is 30.3 by 11.8 inches, about 358 square inches, and the RLT Home Total Spectrum ULTRA is 64.3 by 11.8 inches, about 759 square inches. This number is fixed and says nothing about light.
- Emitting area. The part of the face that actually holds LEDs. Frames, handles and bezels count toward panel area but not toward light, so emitting area is a little smaller. Brands rarely publish it.
- Effective treatment area. The part of the skin surface that receives an irradiance close to the stated figure at your chosen distance. This is the one that matters for dosing, and it is the one nobody prints, which is why it has to be estimated.
The irradiance versus total power explainer covers why area and strength are separate questions. This page picks up where it leaves off and asks how much of the face the strength number really applies to.
Why the edges read lower
The irradiance figure on a spec sheet is a single-point reading, usually taken at a fixed distance of 6 inches. Where that point sits matters. Near the middle of a flat LED array, every nearby LED adds light at that spot. Near an edge, there are LEDs on only one side, so fewer sources contribute. The result is a light field that peaks in the middle and tapers outward.
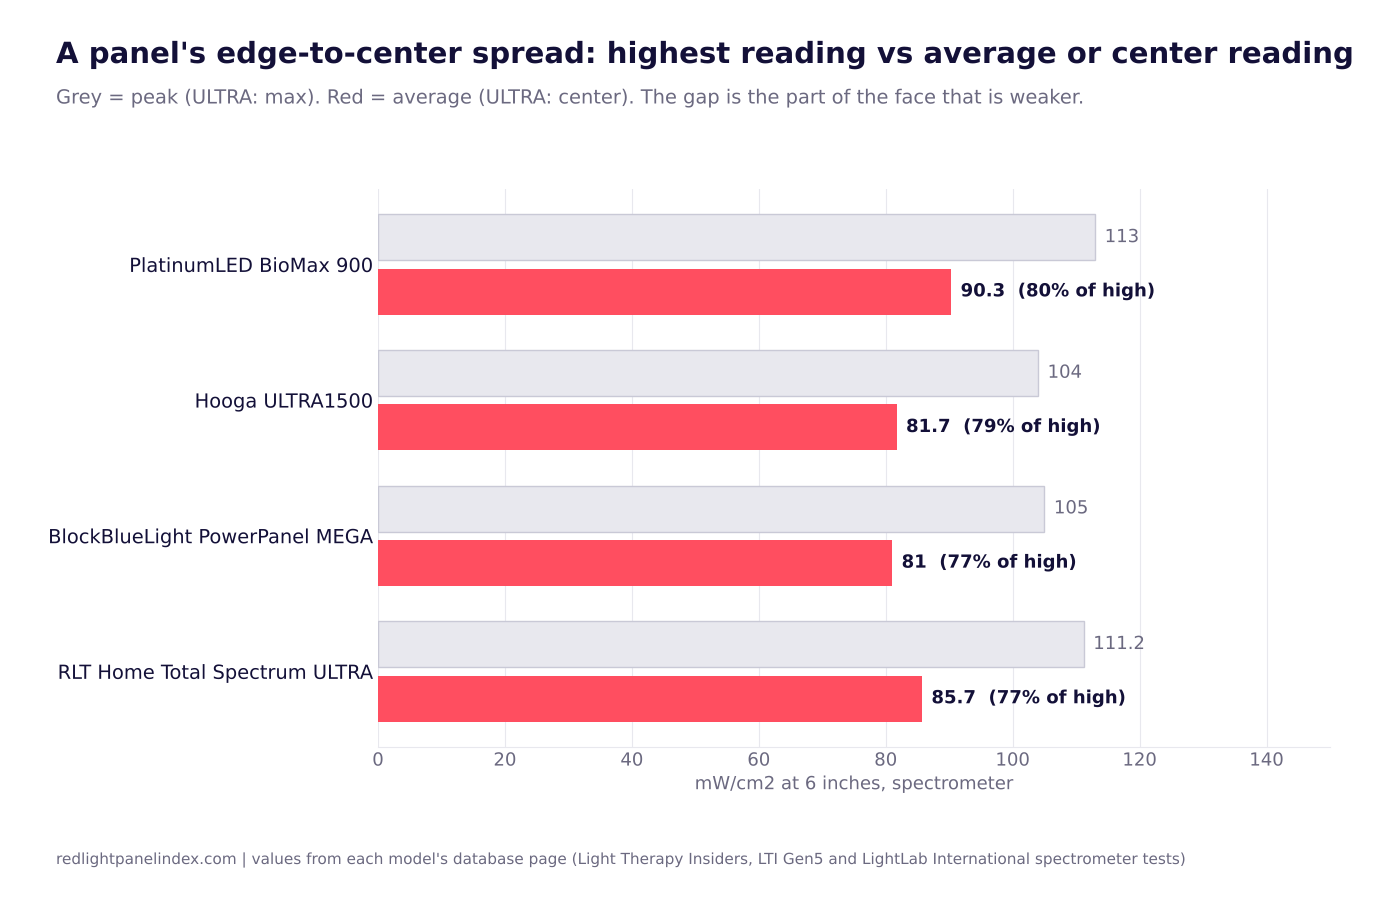
Independent lab tests in the database let us see how large that taper is. Where a lab reports both a highest reading and an average or center reading at 6 inches, the second is consistently lower:
| Panel | Highest reading | Average or center reading | Second as share of first |
|---|---|---|---|
| PlatinumLED BioMax 900 | 113 mW/cm2 (peak) | 90.3 mW/cm2 (average) | about 80 percent |
| Hooga ULTRA1500 | 104 mW/cm2 (peak) | 81.7 mW/cm2 (average) | about 79 percent |
| BlockBlueLight PowerPanel MEGA | 105 mW/cm2 (peak) | 81 mW/cm2 (average) | about 77 percent |
| RLT Home Total Spectrum ULTRA | 111.2 mW/cm2 (max) | 85.7 mW/cm2 (center) | about 77 percent |
The percentages are our arithmetic on the published pairs, not figures the labs reported. The first three rows compare a peak with a panel-wide average, so they describe the whole face. The last row compares a maximum with a center reading from a different lab than the 119.28 mW/cm2 figure on the same model's page, so it shows the spread between two points rather than an average. All four were measured with a spectrometer at 6 inches. A panel that is brightest in the middle is not a defect; it is what a flat array of point sources does. The practical point is that the headline figure describes the best spot, and the average skin patch under the panel receives somewhat less, roughly three quarters to four fifths of it in these examples.
How distance changes the area
Moving the panel back widens the lit area and lowers the irradiance on it. Two effects combine. The light from each LED spreads over a larger patch, and the beam angle decides how much of that spreading happens. The database lists a 30 degree beam angle for the RLT Home models above and 60 degrees for the BlockBlueLight PowerPanel MEGA.
A rough geometric picture, which is an estimate and not a measurement: if beam angle is read as the full angle at which intensity falls to half, light from an edge LED reaches about d times tan(half the angle) beyond the panel's edge at distance d. At 6 inches that is roughly 1.6 inches for a 30 degree beam and roughly 3.5 inches for a 60 degree beam; at 12 inches the figures double. So moving from 6 to 12 inches adds a few inches of lit margin on every side, while irradiance falls. The distance guide works through how steeply, and the inverse square law explainer explains why a flat panel falls off more gently than a single point would.
The trade is the one that matters for planning. Closer gives a stronger dose on a smaller, more uniform patch. Farther gives a wider, weaker field with a longer session to reach the same dose. Neither distance increases the amount of light the panel emits.
Estimating positions for a session
Count positions with a simple method you can do with a tape measure.
- Measure the body area you want to treat. For example, a thigh from hip to knee, or a torso from shoulders to hips. Width and height in inches.
- Shrink the panel to its effective size. Take the panel's width and height and subtract roughly an inch or two from each edge, because the outer band reads lowest. This is a judgment, not a measurement; a panel with a wide frame loses more.
- Divide. Height of the target area divided by the effective height gives positions along the length; width divided by effective width gives positions across.
- Round up and add overlap. Adjacent positions should overlap slightly so that the weak edge of one placement falls on the strong middle of the next.
Worked example: a lying-down session
The database lists the ULTRA at 64.3 inches long, which is tall enough to span an adult lying down in a single placement, and the COMPACT at 30.3 inches. Take a target region of about 60 inches from head to knee, an illustration we chose and not a clinical figure. The ULTRA's effective length is about 60 to 62 inches after trimming an inch or two from each end, so one position covers it, though a person's width will exceed the panel's 11.8 inch width, so the shoulders and hips may sit partly outside the strongest band. The COMPACT's effective length is about 26 to 28 inches, so the same region takes roughly three positions with overlap. Time per position does not change, so session time scales with the number of positions.
Worked example: dose per position
The dose calculator uses irradiance times seconds divided by 1000. At a target of 20 J/cm2, the arithmetic for the BlockBlueLight PowerPanel MEGA is:
- At its independently measured peak of 105 mW/cm2: 20,000 divided by 105 is about 190 seconds, or 3.2 minutes.
- At its measured average of 81 mW/cm2: 20,000 divided by 81 is about 247 seconds, or 4.1 minutes.
That roughly one minute gap per position is the cost of planning against the average rather than the best spot. Over three positions it is about three extra minutes. If you plan against the peak, the weaker parts of your treatment area get roughly 77 percent of the intended dose. If you plan against the average, the best spot gets a bit more than intended. Planning against the average is the safer default when a lab reports one, and the joules per square centimeter explainer gives the dose ranges trials have used.
When irradiance is not method-labeled
Everything above assumes a spectrometer reading at a stated distance. Many brand-supplied figures name neither. The claimed versus measured dataset shows that a solar meter reads about twice as high as a spectrometer on the same panel, so a coverage estimate built on an unlabeled number inherits that error. If a figure names no instrument and no distance, treat the coverage estimate as optimistic, and see the spectrometer explainer for what the better method does.
Checking your own panel
You do not need a lab to see the taper. A solar power meter is not a precise instrument for LEDs, but it shows relative differences: take readings at the center and near each edge at your normal distance and compare ratios, not absolute values. The guide to verifying irradiance at home explains the procedure and its limits. If the edge reads far lower than the middle, shrink your effective area accordingly.
What this does and does not tell you
This page is about geometry and measurement. It does not say that a larger treatment area produces better outcomes, and none of the numbers here come from a clinical trial. Trials in the evidence pages mostly applied light to one body site at a stated dose, so coverage across the whole body is a convenience question, not an evidence question. If you are deciding between panel sizes, the targeted versus full panel guide sets out the trade-offs with real prices, and the full-body panel ranking scores models partly on physical dimensions. A dedicated comparison of half-body and full-body panels is not yet published on this site.
Quick summary
- Panel area is a fixed number; effective treatment area is smaller and depends on distance and where the reading falls off.
- Spectrometer pairs in the database show average or center readings about 77 to 80 percent of the highest reading at 6 inches.
- Count positions by trimming the panel's edges, dividing the target area, rounding up and overlapping.
- Plan session length from an average figure when a lab reports one, and from the single spec-sheet figure only with the understanding that it flatters the edges.